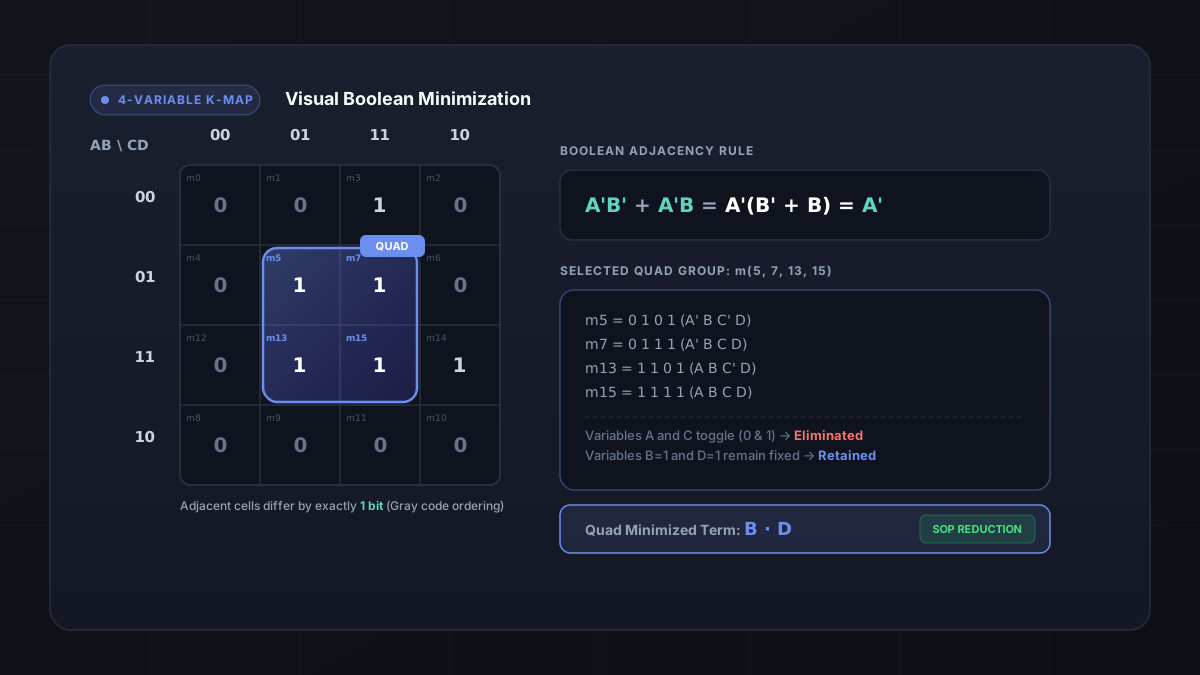
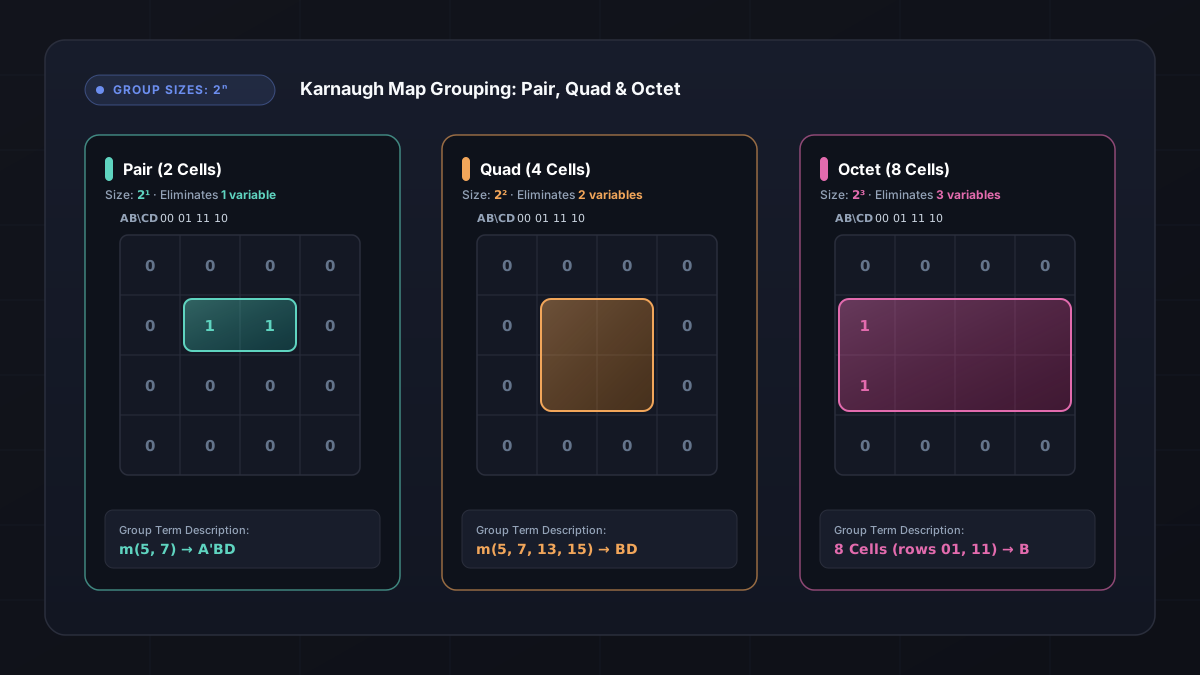
Small Karnaugh Maps are the clearest way to learn Boolean grouping. When you begin with a 16-cell grid, it is easy to get lost in visual patterns and miss why terms simplify. In contrast, 2-variable and 3-variable maps are compact enough to solve manually in minutes, yet they introduce every core grouping mechanic: Gray-code indexing, rectangular groups, edge wrap-around, and the exact reason variables drop out of an expression.
If you need a refresher on basic minterm definitions or truth tables before starting, read our introductory guide on what a Karnaugh Map is. Otherwise, let us work through the layouts, calculations, and student traps on 2- and 3-variable grids.
2-Variable K-Map Layout
A 2-variable Boolean function has two inputs, usually written as A and B. Because each variable has two possible states, there are $2^2 = 4$ input combinations, giving minterms m0 through m3.
The map is arranged as a 2×2 grid:
- Row axis: variable
A(values0and1) - Column axis: variable
B(values0and1)
| A \ B | 0 | 1 |
|---|---|---|
| 0 | m0 (00, A'B') | m1 (01, A'B) |
| 1 | m2 (10, AB') | m3 (11, AB) |
Each cell holds the output for one specific input combination. For instance, cell (row 1, col 0) corresponds to $A=1, B=0$, which is minterm m2 ($AB'$).
Because each step along a row or column changes exactly one bit, every cell in a 2×2 map directly touches its logical neighbors on paper.
Worked Example 1 — A 2-Variable Map Where One Variable Disappears
Consider this function:
F(A, B) = Σm(2, 3)
1. Minterms and Filled Map
The function requires 1s at minterms m2 ($AB'$) and m3 ($AB$):
| A \ B | 0 | 1 |
|---|---|---|
| 0 | 0 | 0 |
| 1 | 1 | 1 |
2. Group Selection and Variable Behavior
Both 1s sit in the bottom row ($A=1$), forming a horizontal 2-cell group—a pair. Valid K-Map group sizes must be powers of two ($1, 2, 4$), so this pair is valid.
Now check what happens across the two cells:
- Variable A: $A=1$ in
m2and $A=1$ inm3. VariableAremains constant. - Variable B: $B=0$ in
m2and $B=1$ inm3. VariableBtoggles.
Because B takes on both states ($B'$ and $B$) while A stays fixed at 1, B cancels algebraically:
F = AB' + AB = A(B' + B) = A(1) = A
Simplified Term
F = A
A pair of size 2 removes one variable, leaving a single literal.
Worked Example 2 — Why the Left and Right Edges Can Be Adjacent
Now look at a vertical pair:
F(A, B) = Σm(0, 2)
| A \ B | 0 | 1 |
|---|---|---|
| 0 | 1 | 0 |
| 1 | 1 | 0 |
Here, m0 ($A'B'$) and m2 ($AB'$) form a vertical pair in column $B=0$. Across this column, A changes from 0 to 1 while B stays fixed at 0. The changing variable A drops out, yielding F = B'.
The Diagonal Trap
Students frequently ask whether diagonal cells can form a pair, such as m0 ($00$) and m3 ($11$):
| A \ B | 0 | 1 |
|---|---|---|
| 0 | 1 | 0 |
| 1 | 0 | 1 |
They cannot. Look at the coordinates between m0 (00) and m3 (11):
Achanges from0to1Bchanges from0to1
Both variables change at once. The Hamming distance is 2 bits. In Boolean algebra:
m0 + m3 = A'B' + AB
Neither variable can factor out; this is an unminimizable XOR/XNOR relationship. Grouping requires a Hamming distance of exactly 1 bit.
On a 2×2 map, opposite edges already touch physically. Column 0 sits directly next to column 1, and row 0 sits directly next to row 1. Edge wrap-around across separated columns only becomes visible when we expand to 3 variables.
Moving from 2 Variables to 3 Variables
Moving from 2 variables to 3 variables (A, B, C) doubles the state space from 4 cells to 8 cells ($2^3 = 8$).
Three key differences emerge:
- Grid Shape: The map expands from a 2×2 square into a 2×4 rectangle, with row variable
Aand column variablesBC. - Gray-Code Sequence: The four columns cannot use standard binary ordering (
00, 01, 10, 11). They must follow Gray code:00, 01, 11, 10. Swapping the last two columns ensures adjacent columns differ by only one bit. - Larger Groups: In addition to pairs, you can now form 4-cell quads and an 8-cell octet. A quad eliminates two variables simultaneously, reducing a term to a single literal.
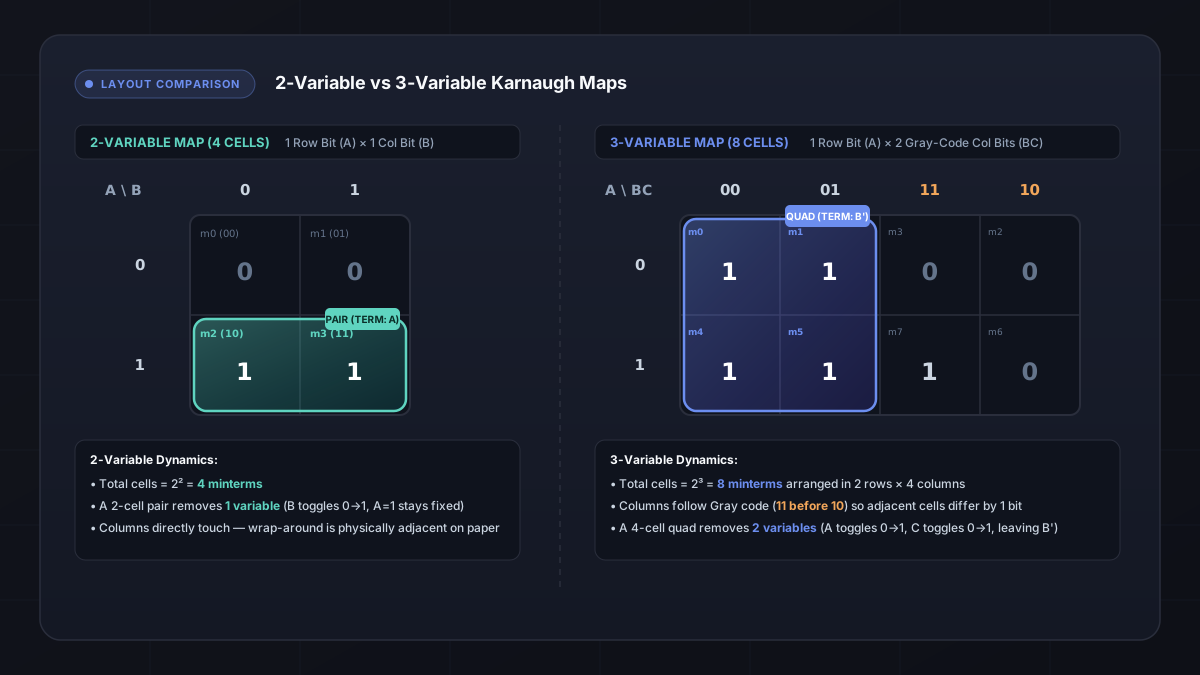
A 2-variable map uses 4 cells where pairs eliminate one variable; a 3-variable map expands to 8 cells with Gray-code columns where quads eliminate two variables.
3-Variable K-Map Layout
Using standard convention, A defines the rows and BC defines the columns:
- Rows: $A = 0$ (top), $A = 1$ (bottom)
- Columns: $BC = 00, 01, 11, 10$
| A \ BC | 00 | 01 | 11 | 10 |
|---|---|---|---|---|
| 0 | m0 (000, A'B'C') | m1 (001, A'B'C) | m3 (011, A'BC) | m2 (010, A'BC') |
| 1 | m4 (100, AB'C') | m5 (101, AB'C) | m7 (111, ABC) | m6 (110, ABC') |
Notice the column order: m3 appears before m2, and m7 appears before m6. If you write 0, 1, 2, 3 across the top row, you are using standard binary. That breaks cell adjacency and invalidates your groupings.
Worked Example 3 — Two Groups Producing a Two-Term Expression
Let us simplify an original 3-variable function that demonstrates how overlapping cells produce a smaller circuit:
F(A, B, C) = Σm(0, 1, 4, 5, 7)
1. Populate the Grid
Place a 1 into cells 0, 1, 4, 5, and 7, with 0 elsewhere:
| A \ BC | 00 | 01 | 11 | 10 |
|---|---|---|---|---|
| 0 | 1 | 1 | 0 | 0 |
| 1 | 1 | 1 | 1 | 0 |
2. Identify the Largest Group First
Always look for the largest power-of-two group before creating smaller ones. Cells m0, m1, m4, and m5 form a 2×2 block of four 1s—a quad.
Examine the variables across these four cells:
- Row A: The quad covers row $A=0$ and row $A=1$. Because
Achanges, it drops out. - Columns BC: The quad covers column
00($B=0, C=0$) and column01($B=0, C=1$).Bstays fixed at0Ctoggles from0to1, so it drops out
With both A and C eliminated, this quad simplifies to:
B'
3. Cover the Remaining Cell with Overlap
Only minterm m7 ($A=1, BC=11$) remains uncovered.
Leaving m7 as an isolated 1-cell group yields the 3-literal term ABC. Instead, look at its neighbors in row $A=1$. Directly to its left sits m5 ($A=1, BC=01$), which is already a 1.
Groups are allowed to overlap. Sharing m5 allows us to form the pair {m5, m7}:
- Both cells lie in row $A=1$, so
Ais retained asA. - Between columns
01and11, variableBchanges from 0 to 1 (drops out), whileCremains fixed at 1 (retained asC).
This pair simplifies to:
AC
4. Combine the Terms
F = B' + AC
Why Smaller Groups Are Suboptimal
A common mistake on this map is forming three separate pairs: {m0, m4}, {m1, m5}, and {m5, m7}. That produces:
F = B'C' + B'C + AC
This expression has 3 terms and 6 literals instead of 2 terms and 3 literals. Always prioritize the largest possible group. For formal grouping priorities, refer to our guide on Karnaugh Map grouping rules.
Worked Example 4 — A 3-Variable Wrap-Around Case
Wrap-around across the outer edges is one of the most frequently missed steps in manual simplification:
F(A, B, C) = Σm(0, 2, 6)
1. Populate the Grid
| A \ BC | 00 | 01 | 11 | 10 |
|---|---|---|---|---|
| 0 | 1 | 0 | 0 | 1 |
| 1 | 0 | 0 | 0 | 1 |
Cell m0 sits on the far-left edge in column 00, while cells m2 and m6 sit on the far-right edge in column 10.
2. Recognize Outer Column Adjacency
Compare the column labels for the first and fourth columns:
- Column 1: $BC = 00$ ($B=0, C=0$)
- Column 4: $BC = 10$ ($B=1, C=0$)
Only variable B changes; variable C remains fixed at 0. Because they differ by exactly one bit, the leftmost and rightmost columns are adjacent.
In row $A=0$, cells m0 and m2 form a valid horizontal wrap-around pair:
- $A = 0$ stays constant $\to$ retain
A' - $C = 0$ stays constant $\to$ retain
C' - $B$ toggles between 0 and 1 $\to$ eliminate
This wrap-around pair simplifies to:
A'C'
3. Cover the Remaining Cell
Cell m6 ($A=1, BC=10$) pairs vertically with m2 ($A=0, BC=10$) in column 10:
Atoggles between rows 0 and 1 $\to$ eliminate- $B = 1$ stays constant $\to$ retain
B - $C = 0$ stays constant $\to$ retain
C'
This pair simplifies to:
BC'
4. Combine the Terms
F = A'C' + BC'
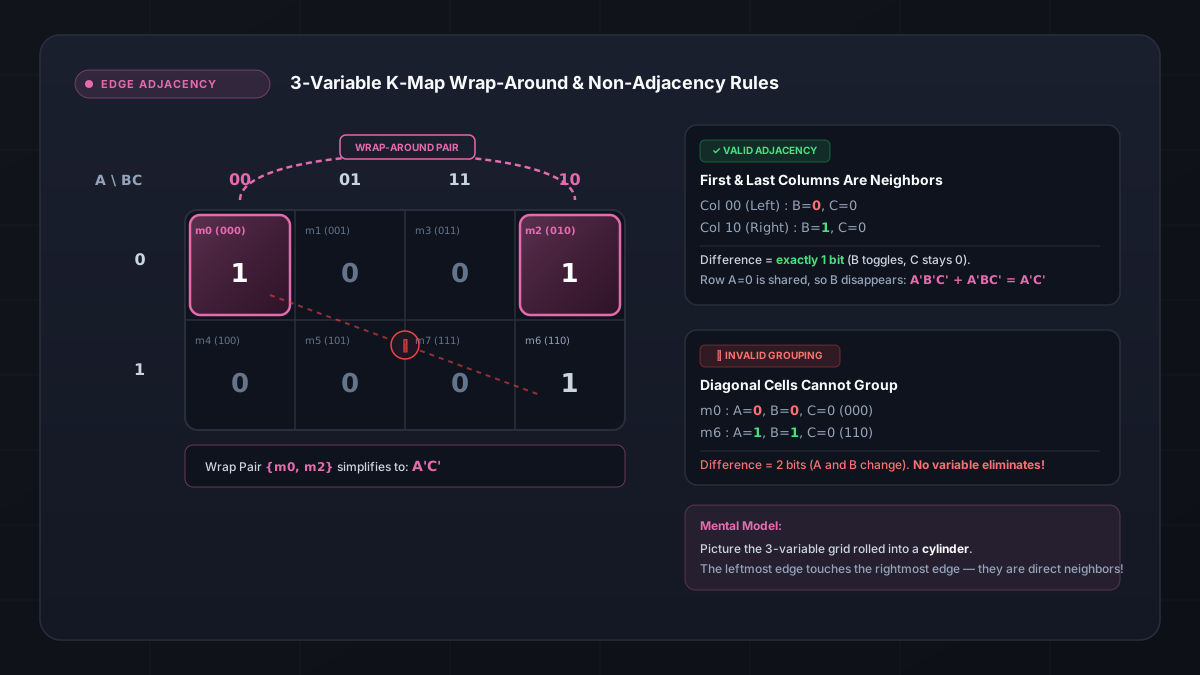
Columns 00 and 10 differ by only one bit, allowing cells on the outer edges to wrap around into valid pairs; diagonal groupings remain invalid because two bits change.
Diagnosing Realistic Mistakes
- Leaving
m0as a singleton: Missing the wrap-around leavesm0isolated, producingF = A'B'C' + BC'. This is unminimized and wastes gate inputs. - Diagonal grouping: Trying to connect
m0(000) andm6(110) diagonally across the grid. Because bothAandBchange (Hamming distance 2), this is mathematically invalid.
If minterm m4 ($100$) were also a 1, cells {m0, m2, m4, m6} would merge into a single 4-cell wrap-around quad spanning the outer columns, collapsing to just C'.
What Actually Changes Inside a Group?
Simplification is governed by a consistent rule:
- If a variable holds the same value across every cell in a group, retain it.
- If a variable changes value between cells in a group, eliminate it.
Look at the wrap-around pair {m0, m2} from Example 4:
m0:  A = 0,  B = 0,  C = 0   (000)
m2:  A = 0,  B = 1,  C = 0   (010)
----------------------------------
     Same    Diff    Same
      A'     Drop     C'
- Variable
Ais 0 in both cells $\to$ retainA' - Variable
Btoggles from 0 to 1 $\to$ eliminate - Variable
Cis 0 in both cells $\to$ retainC'
Because group sizes must be powers of two, variable elimination scales predictably:
- A singleton (1 cell, $2^0$) eliminates 0 variables
- A pair (2 cells, $2^1$) eliminates 1 variable
- A quad (4 cells, $2^2$) eliminates 2 variables
- An octet (8 cells, $2^3$) eliminates 3 variables (collapsing the map to
1)
Common Traps on Small K-Maps
Watch for these six common student errors:
- Using binary order instead of Gray code: Writing columns as
00, 01, 10, 11instead of00, 01, 11, 10, which breaks adjacency between columns 2 and 3. - Treating diagonal cells as adjacent: Diagonal cells differ by at least two bits and can never form a pair on their own.
- Missing outer column wrap-around: Overlooking the adjacency between column
00and column10in 3-variable maps. - Forming two pairs instead of one quad: Leaving four adjacent 1s as two pairs rather than merging them into a 4-cell quad.
- Keeping a changing variable: Retaining a variable in the final product term even though its bit toggled across the group.
- Mixing SOP and POS logic: Grouping 1s for one term and 0s for another in the same pass. Use only 1s for Sum-of-Products and only 0s for Product-of-Sums. For details, see our guide on SOP vs POS in Karnaugh Maps.
Check the Result with the Karnaugh Map Solver
Automated solvers provide a fast way to verify manual calculations and confirm that your expression is minimal.
Here is how to check Worked Example 3 (F(A,B,C) = Σm(0, 1, 4, 5, 7)):
- Open the Karnaugh Map Solver homepage.
- Set the variable selector to 3 Variables.
- Confirm the output form is set to SOP.
- Click on cells 0, 1, 4, 5, and 7 to toggle them to
1(or enter0, 1, 4, 5, 7into the minterm field). - Review the highlighted grouping: the solver displays the blue 4-cell quad and the overlapping 2-cell pair.
- Check the simplified expression:
F = B' + AC
The tool also produces a complete Quine-McCluskey prime implicant table and gate circuit to verify your working.
2-Variable vs 3-Variable K-Maps at a Glance
| Feature | 2-Variable K-Map | 3-Variable K-Map |
|---|---|---|
| Total Cells | 4 ($2^2$) | 8 ($2^3$) |
| Grid Dimensions | 2 rows × 2 columns | 2 rows × 4 columns |
| Row Variable(s) | A (values 0, 1) | A (values 0, 1) |
| Column Variable(s) | B (values 0, 1) | BC (Gray code: 00, 01, 11, 10) |
| Largest Non-Trivial Group | Quad (4 cells $\to$ output 1) | Octet (8 cells $\to$ output 1) |
| Pair Simplification | Eliminates 1 variable (leaves 1 literal) | Eliminates 1 variable (leaves 2 literals) |
| Quad Simplification | Eliminates 2 variables (leaves constant 1) | Eliminates 2 variables (leaves 1 literal) |
| Wrap-Around Adjacency | Cells directly touch on paper | Leftmost column (00) wraps to rightmost column (10) |
| Most Common Student Error | Diagonal grouping between m0 and m3 | Swapping columns 11 and 10; missing outer wrap-around |
Final Takeaway
Karnaugh Maps are visual tools for algebraic factoring, not arbitrary shape-matching. Every pair or quad you draw exists solely to identify which variables remain constant while others toggle between 0 and 1.
Once you are comfortable with Gray-code column ordering and edge wrap-around on 2-variable and 3-variable maps, scaling up to a 4-variable Karnaugh Map or a 5-variable Karnaugh Map follows the exact same logic across larger grids.